One thing we enjoy in our off-grid life is coming up with ways to re-purpose items to meet our needs. In most cases, it starts with an idea of something we want to build or a problem we want to solve. After mulling it over and discussing it with each other we end up with either a plan we devised together that we think might work, or an idea from one of us that we want to prove will work.
Over the past year, we have had many success stories, some that are still in the works, and a few failures. Today, I am going to share a few stories that cover all these scenarios.
First is the "Hey! That Really Works!" category:
As I think of some of the random items we have used in interesting manners to fulfill our needs, I realized we have various types. There are those that we have used, thought they were wonderful at the time and then later upgraded to yet a better idea. There are others that we use all over the place as a solution to a myriad of challenges - our go-to accessories to off-grid life. And then there are those that, when we see them we realize they have potential and thus bring them home and find a purpose for them.
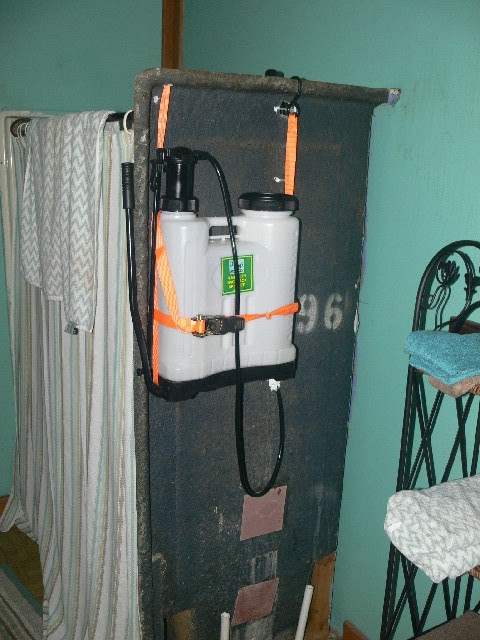
Problem: Showering With No Running Water
Solution: Backpack Sprayer Becomes Our First Shower
When we first arrived at the property we had no running water. We had a fully equipped bathroom - tub, shower stall, sink and toilet but no water. On our first, of many, many trips to home improvement stores, Alan picked up a watering can. I was trying to figure out which weeds he felt deserved to be watered in the yard as we had no grass, flowers or vegetables anywhere on the 20 acres that I knew of. When I questioned the reason for this purchase, he introduced me to our first shower. The previous owners of the house had installed a bath/shower enclosure, but had never finished it off. The end where the plumbing is connected has open access in the bathroom. So one of us could hold the watering can over the enclosure and thus be the shower-er while the other stood inside the tub enclosure as the shower-ee. The solution was adequate, but not really convenient, especially for the one of us with long hair. (
Note only one of us had long hair at that time.)
One day, while at one of our favorite shopping meccas - Harbor Freight, Alan spotted a backpack sprayer that is usually used by lawn care specialists and gardeners to spray liquid fertilizers or insecticides across large areas.
Ding! the light bulb above his head lit up. With the 'business end' of the shower enclosure open for easy access, Alan was able to creatively mount the sprayer so that we could operate the pump handle while standing inside the shower. Imagine that, taking a shower was no longer a two-person endeavor.
In past posts, you have read how we have had several revisions to our shower and we now have hot, pressurized water that can sometimes be practically unlimited as long as we have had recent rainfalls and the 275 gallon holding tank is not getting low. Despite these extravagant upgrades, we still keep the backpack sprayer attached to the shower stall as it was one of our favorite inventions and can still be used as a back-up if need be. There is a saying that "two is one, and one is none"... always have a backup!
Problem: Gardening On Property with NO Dirt
Solution: Wood Pallets and Kiddie Pools
I knew I would have to used raised beds for gardening as our mountain property is comprised of rocks (of all sizes) held together with clay as hard as concrete. I built one raised bed last fall because I had picked up some berry bushes on clearance. I started bringing in bags of top soil to fill the bed every time we went to Lowe's or Home Depot. I could not believe the amount of dirt it took to fill that one bed.
 |
My peppers and carrots did well
in the pallet bed. |
Over the winter, I started researching alternatives to your typical raised beds and came across wood pallets being used. There are two configurations for this - lay the pallets on the ground, fill with dirt and plant so that the dirt between the slats are the rows. Or, back the pallets with landscape fabric, fill with dirt and then lift them so that they stand nearly upright, leaning them against something so they are at a slight angle. I went with this option since I could rest the top of the pallets against the bottom of our deck, which is several feet off the ground. I felt that by growing the plants at this angle in the dirt, I could grow plants with larger root systems. Since this was experimental, I did not want to put all my eggs in one basket, nor did I want to construct multiple pallet beds if they were not going to work, So I started out with one for this year and planted celery, peppers and carrots in it. The celery died rather quickly, but I had heard celery is difficult to grow, so I was not deterred. To date I have harvested quite a few peppers and some baby carrots. So I consider this experiment a success and plan to build more pallet beds over the winter.
 |
Hoping the baby carrot plants will be ready to harvest
before the first frost |
One thing I have learned since moving south is that there are many vegetables you can plant twice in the growing season down here. My carrots seemed to be doing well, so I wanted to plant more that would hopefully be ready to harvest by late fall. I still had a packet of 'stubby' carrots, that grow to about 5 inches. Another alternative raised bed idea I had (
Ding!) was to use small plastic kiddie pools. There were some on clearance at the local Dollar General so I picked one up, drilled a few holes in the bottom and filled it with a mix of top soil and peat. There were more carrot seeds in the little packet than I thought, because it looks like I have grass growing in the pool, I will need to do some thinning soon.
 |
A broken tote becomes a
container garden. |
I also had some peas I had not planted this spring (remember the birth of grandbaby #3 meant a trip back to Wisconsin right in the middle of planting season). The seed packet said you could also plant the peas in June or July as a fall vegetable. Well, it was now early August, but the kiddie pools were cheap and I still had more dirt, so I decided to give it a try. I started the peas and some brussels sprouts in planters and then have since transferred the peas to the pool (so much for no peaing in the pool!) and some of the brussels sprouts are now in a plastic tote that a corner had broken on. I had drilled holes in the tote for drainage and we will see how it works as a container garden, double points for re-purposing something that is broken.
Problem: Washing Large Laundry Items Like Sheets and Blankets
Solution: Zeke's Bathtub
When it comes time to wash sheets, blankets and throw rugs, I
could just bundle them up and haul them off to a laundromat; but that goes against all our off-griddiness. For months, my washing machine was a 5 gallon orange Home Depot bucket. I could only fit in a few pieces of clothing at a time to 'churn', but as long as I did laundry often it was not a problem -
except when it came to washing our bedding. After stuffing a sheet into the bucket, there was very little room to add water and definitely no way to get any agitation action with my hand washer (similar to a plunger).
 |
Zeke inspects his off-grid bathtub,
complete with colorful plastic frogs. |
Enter re-using a solution from another problem solved: When our youngest daughter's family was coming to visit last January, I realized we needed a solution for giving our 18 month old grandson baths. He was too big for your typical baby bath tub, and putting enough water in our tub would quickly deplete our water supplies. I remembered the big plastic buckets with rope handles that we had used as toy chests for our kids years ago. One of these would be large enough for Zeke to sit in, and yet would only take a few gallons of water to fill it deep enough for his bath. On our next shopping day, I picked up my idea for a toddler bath tub at Wal-Mart and it worked great for Zeke's bath times in front of the wood burning stove.
 |
| Rinse Cycle |
When our guests left, I realized I could fit a lot more laundry in this large storage bucket than in my current orange 5 gallon washing machine. It does take a bit more water to get it deep enough for adequate agitation, but since our water collection and storage had also improved by then, it was not an issue. However, I still could not bring myself to pour enough of our hard earned water into the tub be able to wash our sheets. You may recall at one time we had been making trips to the car wash to fill our water containers. One morning as I was putting a load of sheets in the tub before heading to church I got another idea (
Ding!) - we were stopping at a car wash after church to fill our water bottles, so I decided to throw the tub (with bedding) in the back of the truck. After church, we filled it at the car wash. And, there was an added bonus - the trip home on our road provided lots of agitation!
Problem: A Plethora (my favrorite word) of Items that Need Secured for Various Reasons
Solution: Bungees Cords, Ratchet Straps and Zip Ties
I have lost count of the sets of ratchet straps (tie-downs) and packages of bungee cords and plastic zip-ties we have purchased over the past year. We have learned to always keep some on had, both at the property and in our vehicles. I will include a few photos of some of the more interesting ways they have been used:
 |
Rachet Straps in Use
Getting our new mattress home, Constructing the shower,
Winching the wood burning stove up the stairs to the deck |
 |
Bungee Cords in Use
Rainwater collection tarp, Securing screening on the water trough,
Aligning the downspout over the opening in the IBC tank |
Category #2 are the "We're Still Working The Kinks Out" ideas:
These are basically ideas we want to work on and haven't had the time (or incentive), or projects we have started on but have not perfected. Well, if not perfected at least working half way decently, but we know it is just a matter of time or finding just the right do-dad even if we don't know what that is yet.
The Not-So-Hot Tub
Alan's idea of relaxing after a long day used to be a long soak in a hot bath. However, that is not congruent with our new life. But once we had full use of our repaired deck, we started thinking about the possibility of a hot tub. There is such a thing as a wood heated hot tub.
I know what vision popped into your head just then, but they use a heat exchanger to heat the water, not a stack of burning wood under the actual tub. We are not ready for that endeavor yet, but we did have a nice sized cattle trough sitting empty since our son-in-law had upgraded our bathroom water storage.
 |
A plethora of totes were set out on
our deck to collect rain water from the roof
|
This spring, Alan made a trip up north with friends that had been visiting and I stayed at the property. He was only going to be gone a couple days and I figured it would be a good test to see how I could handle things on my own. We had massive rain storms almost the entire time he was gone and I was still collecting water in our wide assortment of totes. We had an empty IBC (250 gallon storage tank) we had not put into use yet, that was sitting right below our deck. I was able to empty water from the totes to a bucket and then lean over the deck rail and pour it into the IBC. I collected so much water, I filled the IBC and it was still raining. It was very hard to watch all that water just flowing away since all my totes were again full and I had nowhere else to transfer the water to for storage.
 |
Alan's not-so-hot tub
(Remind you of a television commercial?) |
Then (
Ding!) I remembered the black trough we had to use to store water in for flushing the toilet. We had upgraded to the gravity fed system with the larger IBC tank Grayson had set up for us and the trough was sitting empty behind the house. It needed some cleaning - but, hey! - I had lots of water right now. I scrubbed the sturdy 100 gallon container and moved it up on the deck. It looked sort of like a bath tub sitting on the deck so (
Ding-Ding!) I was going to surprise Alan with a not-so-hot tub when he got back home. The cool-tub worked fairly well for part of the summer, Alan even picked up a small swimming pool filter we could run to clean it. We still need to work on some maintenance issues, and the tub is currently empty but we will probably re-visit this project in the fall.
The Greenhouse Food Dehydrator
 |
Greenhouse, Water Warmer
& Possible Food Dehydrator |
We happened to be at Harbor Freight one day (surprise-surprise) and I saw they had very inexpensive small greenhouses on sale. They are basically a set of metal shelves that have a plastic cover with a door that zips open. I originally got this to use for starting garden plants. I bought it last fall, thinking it would not be used until spring. However, soon after we brought it home Alan thought of another use (
Ding!). He painted a couple sturdy plastic gallon jugs black, filled them with water and placed them on the greenhouse shelves. Voila! Warm water waiting for us when we need it.
We really didn't use our warm water heater for long because we got the propane water heater for the shower soon after that and Alan plumbed it to be able to heat up jugs of water as well. However, is that another
Ding! I hear (
Ding!), I have been experimenting with another use for the greenhouse this summer. With the vegetables ripening, I decided I wanted to start dehydrating most of them. Yes, I love to can, but not when it is over 90 degrees everyday. And besides, dehydrated vegetables will take up a lot less space than canning them. I will be hiding most of the garden produce in soups and stews as Alan claims to be chlorophyll intolerant, so appearance is not a big issue in the final product.
With the ambient temperature between 90 and 100 most of the day, I figured the area inside the greenhouse would be warm enough to set up as a dehydrator. After some testing to verify the temperatures, I placed my first rack of tomato slices into my super-sized dehydrator and was looking forward to a batch of sun-dried herbed tomatoes. I forgot to take one thing into consideration - the bottom of the green house is not enclosed. The shelves sit on out deck and the plastic cover slides over the top of the shelves and covers all four sides when zipped, but not the bottom. Flies quickly learned of the opening, and as I did not want to store the dried foods that were fly-leftovers, I tabled this project for a while. This winter I will either perfect my greenhouse food dehydrator, or build a solar dehydrator. For this year, I am using the pilot light in our oven to dehydrate our produce. While I am prepping the food I turn the oven on low for a few minutes to heat it up a bit more that the pilot light does, then shut it off and pop in the trays of food. The trick is to remember to remove the drying foods
before preheating the oven for baking, I did end up with one batch of blackened tomatoes.
The Canning/Pantry Shelves
We have a variety of shelving units around the house. Some are more industrial, such as the ones in the utility room which hold many heavy items such as cans of paint and our bottles of filtered water; while others are the cheap plastic pop-together type. However, none of these shelves fit a current need I have for storing my home canned foods and other pantry items. The flaw with all these shelves is the height between the shelves. I want shelves that are spaced more narrowly together, just a bit more height than a quart jar between each shelf. I do not want to double stack my jars on the taller shelves, nor do I want all the wasted space if I put just one level of jars on these shelves. So, I have been on the lookout for an inexpensive way to create the shelves that would be
just right for my canning - very sturdy and with closely spaced shelves.
 |
Wood Thingies patiently waiting on my
park bench dreaming of the day they will
be part of a shelving unit. |
Enter my
wood-thingies. We have some close friends down here that we have been spending a lot time with (and it's not because they have air-conditioning). We are very like minded and share a lot of interests and laughs together, and they are much more talented at being resourceful and re-purposing items. One day, as we pulled into their drive, I spotted three stacks of what I started calling 'those wooden thingies' for lack of a better way to describe them. On closer inspection, the first idea to pop into my head (
Ding!) was canning shelves. I learned these
wood-thingies-of-vast-possibilities were a dumpster find, and I made sure to bring our conversation around to what they were going to use them for, and, more importantly, if they had any to spare. I snagged nine of them with plans already starting to churn in my head as to how to make these the end supports of a sturdy canning shelf unit. I have re-worked them several times in my head, but have as yet failed to remember to actually measure the frames to determine the width I need for the actual shelves.
And finally there are those "What Were We Thinking" ideas:
These are the ones we hate to admit to, the ones we should have known were not good ideas.
Needed: Another Wooden Frame to Elevate an IBC
Not-So-Good Idea: Alan will build this one himself
Earlier in this now lengthy blog post, I mentioned that our son-in-law had built a platform that would hold a full IBC tank for a gravity feed water supply to the bathroom. I am sure you have all done the math to determine what this actually entails, and came to the conclusion that when filled the water alone (275 gallons) weighs over a ton. 2289.33925 pounds to be exact if the air temperature is 68 F.
 |
The IBC sits on the frame
constructed by Alan... |
We had another IBC and we decided to elevate it in a similar manner. We wanted it to catch rain off our shed roof and then we would connect it into the utility room for laundry, etc. As we had a pump in the utility room to draw water from this tank, we only wanted to elevate it enough to be able to place a bucket under the spigot so that we could directly drain water from the tank for watering the garden. So, with the platform only needing to be a couple of feet high, and the fact it would not need to hold quite so much weight as this was a 250 gallon tank, Alan got to work on the construction project. One thing Alan will be the first to admit is that he is no carpenter. He is great with plumbing and electrical work, but we both breathed a huge sigh of relief when our son-in-law came down to work on our drywall and deck replacement. But hey, the platform didn't have to look pretty, and we had plenty of scrap lumber to reinforce it and make it sturdy.
I was working on other projects inside the house while Alan tackled this one. Every once`in a while you know there is a project that is best not worked on together, and I was pretty sure this would be one of them. I did occasionally check out the door to see how it was going, especially if I hadn't heard any hammering or muttering in a while. In a surprisingly short time, the platform was in place and the empty IBC was on it. While our bathroom IBC is cylindrical, this one is a cube, as most of them are. The majority of these large cubes are reinforced by being placed in metal frame cages, but this one had come in a cardboard box, which we had removed - think giant milk jug.
 |
| ... until water was added. |
With the tank in place, Alan started transferring water from yet another IBC - the one next to the deck that I had filled from all the totes of rain water. I peeked out the door a few times as the new raised tank was filling and all was going well. When it was full, and Alan shut off the transfer pump, I breathed a sigh of relief. The platform had held and our new tank was ready to provide water to the utility room and our garden. Back to work on my project in the house. About ten minutes later, I heard a loud cracking noise and a ground shaking thud. I raced to the door and saw the new tank was once again on the ground. Surprisingly, it had not ruptured. However, since it was still full, we once again had to transfer all the water back to the tank by the deck so that we could move the fallen tank out of the way to start over.
 |
The sturdier IBC is now located behind
the house AND on the ground |
We decided to switch gears and build a platform out of concrete block and a pallet. This worked with almost no mishaps. We once again transferred the water back to the shed tank and with the addition of some rain gutter we were also set to collect rain water from the shed roof. We quickly learned that 10 feet of gutter on the shed did not provide nearly as much water as 10 feet of gutter on the house roof. Don't worry I am not going to get into that geometry problem. So, after all that, we decided to take the now empty IBC sitting next to the deck, move it behind the house, next to the utility room and attach gutter to that section of the roof to fill the tank. Alan used 20 feet of gutter here and in the last rain storm that 250 gallon tank was filled and overflowing within a a couple hours.
Needed: More Water
Not-So-Good Idea: Collecting Snow
If you have been reading these posts in the past, you will know I am somewhat obsessed with collecting water. When we started out, we realized keeping up with water consumption was much more difficult than supplying our electricity needs. We originally had to drive out and bring water back to the property. Then we retro-fitted the well on the property so we could draw water from it using a torpedo bucket. Next, we set up rainwater collection systems, which greatly boosted our water supply. Despite always having an adequate water supply, I still feel the need to collect all the water I can, it is so hard to watch water just pour from the roof onto the ground during a rainstorm.
 |
| Snow collecting equipment |
This winter, we had several
big snow storms - about 2 to 3 inches each time and I had another bright idea (
Doink!) All that water was just sitting on our deck, waiting for me to collect it. So, I grabbed some special snow collection tools from the kitchen and started filling containers with the snow from the deck rails as I assumed it would be cleaner than snow from the deck itself.
 |
Buckets of snow
equals cups of water |
I dragged the snow-filled totes back into the utility room and waited for the snow to melt to add to our water stores. Boy was I disappointed, depending on the 'fluffiness' of snow, it can take about 10 inches of snow to equal one inch of water. All those totes of snow I collected produced maybe a couple gallons of water. And, FYI, falling snow is dirtier than you would think.
Needed: Containers to Transplant Squash Vines Into
Not-So-Good Idea: Using Children's Sand Buckets
This was my first time gardening in a long, long time. That and the fact that we have no dirt on our property means there was a lot of trial and error this year. My original plan was to use a flower bed that was already in place as my main garden for this year. After digging up hundreds of rogue flower bulbs from the plot, and ignoring all the rocks I was hitting, I was ready to start planting.
 |
| Root-bound squash plant |
I had started a lot of seedling indoors and was in the process of transferring them to the garden plot. This is a small plot that was quickly filling up. I had some acorn squash plants that needed to be transplanted, but I was worried their vines would take over everything if I added a row of them to the garden plot. The area we had fenced off to keep the deer from the garden was larger than the garden itself, so I decided to put the squash in containers along the inside of the fence. They would be a couple feet from the other garden crops and would also be able to vine up the fence we had constructed. All I needed were containers. (
Doink!) I had some sand buckets that I had used to anchor the garden flag stakes I had used for my birdhouse display (another not-so-good idea because they were top-heavy even with rocks in the little buckets). As the metal stakes had punched through the bottoms of most of the plastic buckets, they were already set with drainage holes. I added top soil to the buckets and transplanted my happy little squashlings. And they grew great.... for about a month and a half. Then all growth stopped. I was basically practicing root-binding, like the tradition of Chines foot-binding, but with plants. Alan did not seem very upset with my failed squash crop, I guess the green on the outside of squash constitutes chlorophyll intolerance. Needless to say, I will be visiting the farmer's market for acorn squash this year.
And that covers all the Not-So-Good Ideas.... When I started thinking about this section, I was hard-pressed for any failures to share. I am sure this dilemma was not because we had no failures, but because we so quickly forget them and move on to what we hope is a better idea. Hmmm, a platform for an IBC made from wooden-thingies and zip ties. Add a bit of duck tape and voila... CRASH!


No comments:
Post a Comment