Monday, May 29, 2017

From Cage to Cooler to Canning Jar

We did it. We have processed our first, home-grown protein. In other words, our first litter of meat rabbits are now residing in our pantry.

Did it go as I expected? Pretty much, except for some huge bruises on my backside!

I will write an outline of how the day progressed. And I apologize in advance for any dark humor that works it way into my descriptions. We do respect our animals, take good care of them while raising them and dispatch them as humanely as possible. In fact our breeding pairs, Roger, Jessica, Honey and Charlie are a part of our family. But, we also realize that Alan and I also have a dark sense of humor that gets us through the more grizzly aspects of living self-reliantly.

Alan was in charge of photos, I haven't looked over them yet to see which ones can be included in the post. As this was our first experience, the educational photos may not be available until the next batch are processed -I don't remember Alan taking pictures during the skinning and butchering process. Those of you who are truly interested in the process can google for videos and and other sites with photos. This was something I did the night before to make sure I was familiar with what we needed to do, and not do.

Preparations started a couple days before as Alan started filtering a larger supply of potable water than we generally use. We had purchased a chest cooler large enough to hold the 'batch' and the plan was to have ice water in the chest to chill the carcasses. I also suggested we have a five gallon bucket with potable water for a pre-rinse before placing them in the cooler. We filter our potable water into 2 1/2 gallon bottles that we usually pour into our small holding tank for our kitchen system.  As he worked on a supply of water for this project, Alan set the bottles aside as they were filled.

The day before the event, we turned on our freezer to make ice and also cool down some of the water. Alan filled some 2-liter bottles with water (no need to be potable) to freeze. He placed these and one of the bottles of potable water in the freezer. When the potable water was chilled he moved it to the fridge, we just wanted it cooled so it would not immediately melt the ice in the bottles when we added it to the cooler. We also mounted the 'Hopper Popper' and the 'Rabbit Cincher' on our deck posts, more about these helpful tools later.

Oh, one final 'prep' was to not feed the rabbits for 24 hours beforehand. Our breeder rabbits are housed in the same area as those that were to be 'dispatched' so I had a dilemma - I did not want to feed the breeders in front of the others, but I also did not want the breeders to go hungry just because we were withholding food from the ones to be dispatched. My solutions was to feed everyone the morning before (the 24 hour cut off), I fed the meat rabbits a very little amount while giving the breeders more than usual as I did not want to give them their usual nightly feeding in front of the ones we had stopped feeding.

The next morning we had a friend arrive who had offered to help. She had processed some rabbits the summer before and thus had some experience. As rabbits tend to scratch I put on work gloves (I was to learn this was a mistake) while Alan went to get the first one from the cage. Alan actually asked me which one I wanted first! We had 'named' all the meat rabbits Stewie but we always blamed Stewie #4 for any trouble that was caused in the rabbitry. When I was sexing the rabbits a few weeks earlier and learned we only had one male out our of the six, we designated him as Stewie #4. He was also the only one with dark gray ears so he was easily identifiable, so I said 'Bring Stewie #4'.

In the foreground is the Rabbit Cincher hanging from a hook
on our deck. Directly below the cincher in the photo you can
see the 'V' of the Hopper Popper which is mounted to the left
of the Rabbit Cincher.
We had purchased the Hopper Popper because it is designed to be a humane way of dispatching the rabbits. Basically, you slide the rabbit's neck into the metal 'V', hold the hind legs and lean back using your weight to dislocate the vertebrate. I took Stewie #4 from Alan, placed him in the Popper, held him by his hind legs, leaned back... and promptly fell backwards onto our very rocky ground. Note to self- do not wear gloves when trying to keep a grip on the rabbit's legs. Thus, the massive bruises on my lower back and backside - the final revenge of Stewie #4.

Placing Stewie #4 in the Hopper Popper.
(Gloves should not have been worn.)
Once each rabbit has been dispatched. We placed their hind feet into the loops of the Rabbit Cincher we had purchased. We went with the cincher in place of the typical gambrel hook to hold the rabbit for skinning/gutting because we thought it would be easier to use. After using it, I feel we made the right decision. The cincher is a basically two slip-loops of braided wire separated by a short length of small diameter pvc pipe. The wire is actually in a triangle configuration with a loop above the pipe for hanging and a slip-loop at each end of the loop for holding the hind feet. Where the grambrel hooks need to pierce each leg above the foot, with the cincher, you simply slide the feet into position and tighten the loop. The hanging loop also provides a lot of mobility for twisting the body while skinning the animal. Note: Place a 5 gallon bucket on the ground under the the rabbit cincher for all unwanted parts to drop into. We placed a garbage bag in the bucket to make clean-up easier.

The first rabbit took me close to thirty minutes to 'muddle through' even though I had read directions and watched a video. The second one was down to about 20 minutes, the biggest learning curve was that I realized I needed to be more aggressive, not hesitant, which came with familiarity with the process and the anatomy. Then I watched our friend do a couple. This was also beneficial because we were able to see difference in techniques that we both used and recognize advantages of changing some of our methods. By the end I could go from 'cage to cooler' in just over 10 minutes while our friend holds the record at just under 8 minutes.

Upon googling how-to instructions prior to The Day, I discovered there was no one set of steps that everyone agreed upon. Based upon my experience last year, when I butchered chickens for the first time, I familiarized myself with the various ways people suggested and then planned to figure out what worked best for me. The further we get into this self-reliance experience the more comfortable I am with figuring out what works best for us rather than trying to replicate what others are doing. By researching several different approaches, I can usually ascertain the important points that need to be adhered to - in this case be sure not to puncture the bladder or intestines - and can then work through the rest in a manner that works for me.

This means the first couple of rabbits were guinea pigs to put into practice what I had been studying. Below is a basic description of the process from the point the freshly dispatched animal is hanging upside down from the rabbit cincher. WARNING: The following details may be considered a bit gruesome by some readers.

A rabbit in the cincher.
Starting the skinning process.
1. Remove the head. Psychologically, this was always the hardest step for me. It was also the most difficult physically on the first rabbit because I did not realize how aggressive I had to be. I probably spent well over 5 minutes trying to delicately cut into the neck. I have a great Morakniv knife that I use for butchering and I was beginning to think that it was badly in need of sharpening when I could not make a cut into the skin. I then decided to toughen up and apply some muscle. That did the trick and once I broke through the skin the knife sliced with the sharpness I was accustomed to and the head came off quite easily after that. Lesson learned - be aggressive.

2. Start skinning at the hind feet. The two techniques I came across that I wanted to try were (a) to cut around each leg near the foot and then cut down the inner leg and pull the skin down the leg and (b) cut the skin up the inner leg from the groin towards the foot then you can easily pull the skin away from the leg  and slide your knife under the skin up by the foot and cut it loose. I found (b) to be quicker and easier. With (a) it was difficult to cut through the skin near the foot because it was stretched so tight at that location. Starting at the groin you could pull the skin up and poke with the point of your knife to get it started.

3. Pull the skin the rest of the way off. With my first two rabbits I took extra time to cut around the tail and also used garden shears to cut off the front feet before pulling the skin all the way off as these were steps included in my reading. However, when it came time for my friend to skin her rabbits she did not do either of these. Once she had the skin loose from the hind legs she simply added a little more muscle and continued to pull and everything came off cleanly. Lesson learned - be aggressive.

4. Open the abdominal cavity. Do not be aggressive. This is where you want to take care not to nick the bladder or intestines with your knife. I am pleased to say we had no such accidents with any of the six rabbits. I was surprised that even though we withheld food and water for 24 hours their bladders and lower intestines were not empty. Back to the technique - carefully make a small horizontal cut in the meat between the hind legs, you can use the hand that not holding the knife to pull the meat towards you a bit and thus put some space between it and the innards. Now you can place your finger in the slit, pointing down, to open up the space between the meat and the innards. Carefully insert your knife next to your finger with the sharp edge towards the meat and carefully cut the meat open. You will be able to cut down for several inches until the start of the rib cage.When you pull your hands away some of the insides may start to fall out, but don't worry everything is fairly 'tough' and will not break open.

5. Disconnecting the innards. Again their are various techniques, my choice is to turn the carcass so the back is facing me and carefully cut the tail bone below the tail. I find kitchen shears or small pruning shears work well when needing to cut through any bones.  Then I turn the carcass back around and carefully cut down along each side of the spine from the tail bone, basically along side where the intestine leaves the body. I just looked at this area closely on the first rabbit and figured out where to cut so that I could keep the tail and anus connected to the intestine and remove it all innards. Once you disconnect the small section up by the tail, everything will easily slide out.

Rinsing the carcass before
placing it in the cooler.
6. Empty the body cavity. This is actually very easy, everything basically falls into the bucket under the rabbit. If you want you can save the heart and liver. We gave all of ours to our friend, you would have thought we were given her treasure! She says rabbit liver is amazing, maybe I will try it next time. Sometimes I had cut off the front feet before skinning, but if not, I cut them off now. I find it easiest to cut them off at a joint, I prefer the knee joint as there is no meat per se on the lower leg. We then rinse the rabbit in a bucket of water and placed them in a cooler of ice water.

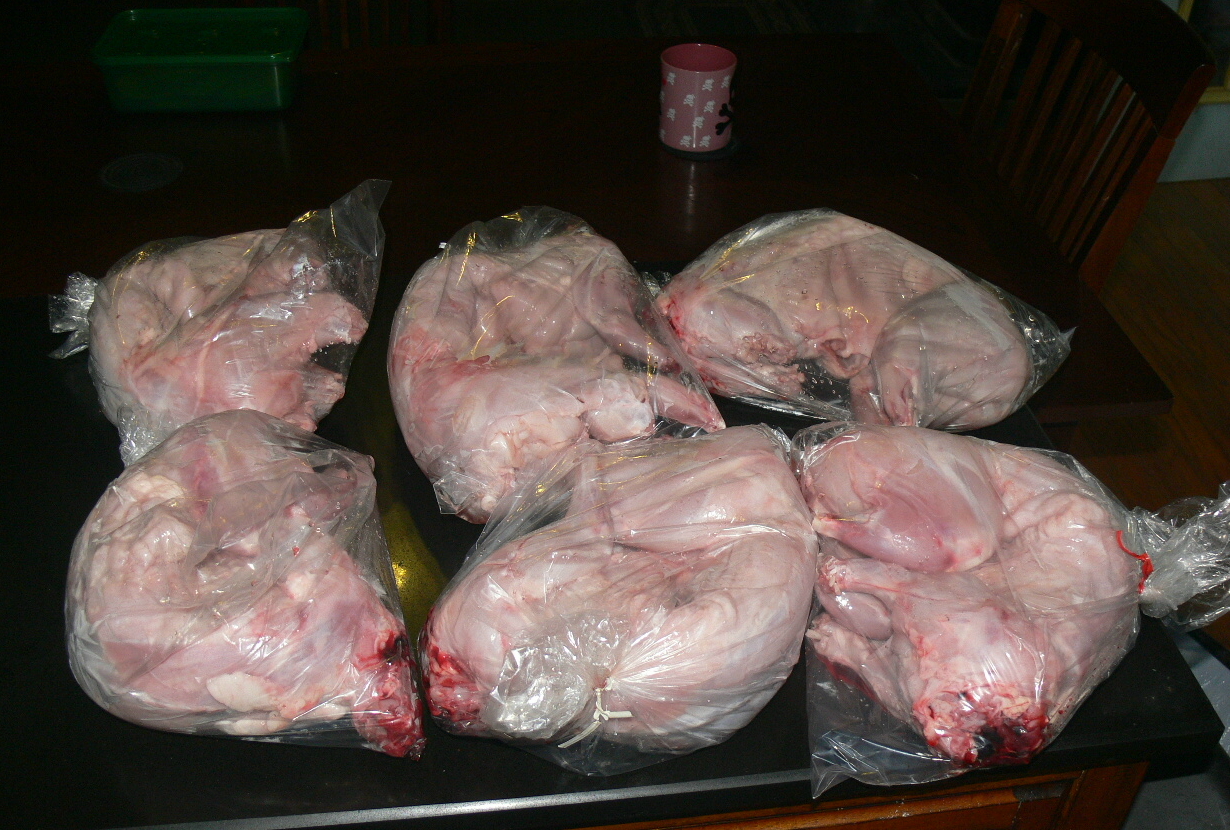
Six rabbits, bagged for a 24 hour cool down in the fridge.
The average weight  of these six bags was 3 pound 9 ounces.
So, that was day #1. As with all fresh killed animals, you either want to eat it within the hour or you want to let it rest in the refrigerator for 24 hours before cooking or freezing it. If you cook or freeze the meat during that 24 hours you will just have tougher meat. Since we pressure can all of our meat for storage, I wanted to prepare these rabbits in the same manner as I do chickens and turkeys to see if we liked the results. I always make a big pot of bone broth and then de-bone the meat, can the meat in pint jars and the broth in quart jars.

The bone broth continues to simmer
after removing the meat from the bones.
After they had been in the fridge for 24 hours I halved the rabbits and started a large batch of bunny bone broth in my largest stock pot. I could only fit five of the six rabbits in the pot, but we had friends visiting that day so they were gifted with Stewie #6. I added the same ingredients to my bone broth as I always do for chicken and turkey bone broth: onion, carrots, celery, garlic, crystalized ginger, kosher salt and apple cider vinegar. I simmered the rabbit until it was cooked through, removed them from the broth, de-boned the meat and then added the bones back to the stock to simmer a couple more hours.

Removing the meat from the bones. The meat will be
canned in pint sized jars and used in soups, stews, etc.
As the bones were simmering I chopped the meat (and sampled quite a bit!) and got the batch of pint jars filled and in the pressure canner. Pints of meat take 75 minutes in the canner after they have come up to pressure and then there is a cool down period. After that, I had the quarts of bunny broth which take 90 minutes in the canner. My pressure canner holds 7 quart jars and I ended up with more broth than would fit in one batch so I put some in the fridge to can a partial batch the next day. It was bothering me that I was going to do a partial batch because I consider that a waste of propane. Since I have the burner on the stove turned on for close to two hours, I want to can as many jars as will fit in the canner.

A sample of our first batch of canned
rabbit meat and bunny bone broth.
Guess which one we will be eating first!
As I was taking the pints of meat out of the canner I was listening to the 'pings' as the lids sealed. They always seal within a half hour or so and I very rarely have one that does not seal. Later I went over to the counter to check all the lids and I was disappointed to discover that one jar had not sealed. Of course, since it so rarely happens, you know what I blamed it on. Or should I say, who I blamed it on - Stewie #4 was in that jar. But, I got the last revenge this time... remember my partial canner load the next day? There was one more jar of rabbit meat getting canned a second time.

Friday, May 5, 2017

I Feel Like We Just Brought Home a New Baby

Have you ever brought a newborn baby home? If so, what is the first feelings that you remember as you found yourself totally responsible for this little being for the first time? Excitement? Fear? Trepidation? Help!?!

Who do you turn to? Friends and family? Your online community? Parenting support groups? Parenting books by experts? All of the above?

Clive, the hive. We set him up on a old
carpet to keep the weeds (and ticks)
down around the perimeter of the hive.
Do you wonder where I am going with all these questions? Well, last Thursday we found ourselves driving home with a bouncing... box of bees. And we were soon to find out that those memories of first coming home with a newborn would be triggered by some similar experiences in the next few days. You may think this sounds ridiculous, but let me be more specific. It was the endless flood of advice, and may I say almost always conflicting advice, every time we had a question about the new additions to the homestead.

First off, it was a premature delivery. We were not 'expecting' the bees until 'sometime in May' according to the local apiary we bought the nuc (nucleus hive) from. When we got a phone call on the morning of April 27th asking if we could come pick up our bees that evening you would think we would have everything ready. After all, I had ordered the bees and the hive back in January. But, with the gardens needing to be planted and a strong penchant for procrastination, the hive still needed a coat of tung oil and then had to be transported and set up in the clearing on the northwest corner of the property that we had designated as the bee habitat.

It was a Thursday, there had been torrential rains a couple days earlier and even heavier rains were in the forecast for Saturday. I was thinking that Mark, the bee guy, wanted to get the nucs distributed to his customers in between the storms. That afternoon, we managed to get the hive completed and set up and arrived to pick up our nuc at the designated time, about 7:30 p.m.

This is the flap on the nuc in the
open position. It is closed by
pushing it down into a matching
cut-out, like a puzzle piece, and
only held in place by friction.
A nuc is a small version of a working hive (think mobile home of the bee hive world), which means the bees are going in and out during the day. By waiting to pick it up later in the evening we were making sure most of the bees had returned to it for the night and would not be left behind when we put in in out truck to bring it home.  We took our truck that has the cap on the bed because we did not want the bees riding inside the vehicle with us. It turns out that the nuc, which is a fairly sturdy, weather proofed corrugated cardboard (Corflute) box (like I said, a mobile home - minus the wheels), has a little flap that closes quite securely to keep the bees in for the trip home. I say quite securely but it is just a flap that pushes in flush with the opening and is held by friction, so we were still glad they were in the back of the truck.

As we were getting ready to leave the bee farm, Mark said he would give us the same advice he gives everyone picking up nucs. Here is the gist of his advice, although he did throw in a lot more beekeeping terminology:
1.Feed the bees for the the first week or so. The solution for feeding in the  spring is a 1 to 1 sugar water syrup. After a week, check the brood box (where we transfer the nuc to) to see if they have drawn (made) comb on the new frames, if so add a second brood box or a honey super (has frames just like a brood box, but the queen can't get into it so it only has honey, no eggs, larvae, etc.). If the new frames are not well established with comb, continue feeding the bees and wait a while before adding another box.
2. Treat for mites sometime in August. If you plan on harvesting any honey the first year, treat for mites after the honey harvest.
3. In fall, after the August harvest, have either a second brood box or a honey super in place and start feeding the bees a 2 to 1 sugar syrup so that they can store up food for the winter.

I nodded and asked a couple of questions and hopefully sounded knowledgeable, while the whole time I am thinking how much of this do I really have to do, I want to be a bee haver, not a bee keeper. We are self-reliant and I want our bees to be self-reliant, too. Also I was starting to feel a bit overwhelmed, like when it's time to bring the baby home from the hospital and you wonder if you really know everything you need to know to care for this new addition to the family.

A sample of our road conditions after heavy rains.
When I mentioned bringing home the bouncing box of bees this was not just a cute reference to tie in with the baby analogy. Remember those torrential rains I mentioned? And you may recall that we have been told by some of the county road crew that we live on the worse road in the county. Well, to go pick up the bees we had to go out the north end of our road, which is the longer end to travel before getting to pavement, about 5 miles. The rains had caused quite a few wash-outs along with flooding where the creek ran across the road in several areas. This left the road in worse shape than usual, including rocks up to the size of dinner plates strewn across it as well as dead fall tree branches as large as fence posts washed down from the mountainsides and onto the road.

I was worried the bees would be upset
after  the last 20 minutes of our trip which
was on our washed-out road.
 By the time we ventured out, the worst of the debris had been pushed to the roadside, but it was still rough going. I hadn't thought anything about it until we were on the way back with the bees. As we turned back onto our road ans started bumping along I realized the bees were not going to be happy by the time we got back to our house after about 20 minutes of being shaken up in the back of the truck. Since it was also almost dark by this time, we decided it would be a good idea to leave the bees in the nuc for the night and transfer them to the hive the next morning. This was the first of many decision we had to make for our new addition to the family.

When we got home, we placed the nuc up by the hive but kept it closed for the night, after an in depth discussion on the pros and cons of opening the door of the nuc for that night. My thinking was that, since the nuc was a mini working hive, it would be fine left 'as is' for the night. It had five frames, where a full size brood box has either eight or ten. And, since the nuc was well established, these frames were full of everything the bees needed and they would be fine closed up for one night. Plus, since we had waited for them all to fly home for the night before picking them up we could assume they always stayed in the nuc all night. Nevertheless as soon as we were in the house I google how long can bees stay in a nuc and found all different answers, both confirming and contradicting my thoughts..

Alan and I stayed up googling quite a few things about bees that night. It's not that I hadn't researched beekeeping before this, in fact, I had taken a three month online course. But, just like when you read all the baby books and thought you knew everything, it all seems different as soon as you bring them home. Oh, and the one sure thing we learned that night was a tidbit Alan came across that he shared with me. It said: If you ask two beekeepers a question you will get three different answers.

This is what the nuc looked like when we opened the lid.
A fully established mini-hive with five frames. The bees
had even started drawing some comb on the box lid.
The next morning we lit the smoker, I donned my protective gear and we hiked up to Clive, the hive. I opened the little hatch on the nuc expecting a huge out pouring of claustrophobic bees, but only a few rambled out to look around. I then opened the top flap to view the frames, which were nicely filled with bees, calm bees I was happy to see. I wafted a little smoke over the top of the frames in the nuc to encourage the bees to meander down into the frames so that I could grasp the upper edges.

When you use smoke you do not want to flood the hive with it, in most cases more is not better. I like to think of it more as herding the bees in the direction you want them to go with puffs of smoke. In order to transfer the frames and bees from the nuc into Clive's brood box I wanted the bees to move off the tops of the frame and down into the nuc so that they were on other parts of the frames. If I had blown smoke into the entire nuc box I would have probably chased the bees completely out of the box and I did not want a few thousand bees to come flying out at me (a typical nuc contains 10,000 bees). While smoke is used to calm the bees, too much smoke will actually lead to an agitated hive due to the confusion it causes.

Using the hive tool to loosen the frames from the nuc box.
Before attempting to lift out the frames, I saw there was some cross comb visible between the frames. This is where the bees build the comb as a bridge between the frames. I could only see the top edges of the frames so I had no idea how badly the frames were stuck together. Time to make more decisions. I used my hive tool, which has a sharp wedge, to split the comb I could see between the top of two the frames. As I wiggled the tool down through the comb I could feel the first frame separate from the next. I then grasped the top edge with both hands and lifted. Nothing happened. The frame was still stuck in the box. I again grabbed the hive tool and this time I used the end that is bent similar to a crow bar. I slid the bent end under the lip of the frame that rest on the box edge and gently pried up to loosen the frame from the box. I did this on both sides and then the frame, along with all the bees currently working on it, easily lifted out of the box and I carefully placed it in Clive. Four more frames to go.

Transferring a double set of frames. The white strip closest
to me in the box is the top of one of the new frames. We are
using plastic frames that have been coated in bees wax.
It turns out, I only had to do this two more times because the next time I pried a frame loose, two came up together and I was comfortable supporting both of them together with my fingers under the lips of the frames. Since Clive is an 8-frame box, we had three new frames in the brood box in addition to the 5 we transferred. You always arranged your frames so that the transferred nuc is in the center and the transferred frames are always kept in the same order as they were in the nuc. So our brood box has a new frame on one end then the five nuc frames and then two more new frames. The bees will now get busy drawing comb (building honey comb) on the new frames to fill out the brood box.

This is the feeder I made to hold the
sugar water syrup. When inverted, a
vacuum forms so that it does not
continually drip through the holes.
What's next? We'll check the new frames in the brood box at the end of the week. At that time, I am fairly certain we will see the new frames on either side of the transferred frames have been filled with comb. Soon after that we will add our second brood box. It is a medium sized box, which is shorter than the current (deep) brood box. It will also have 8 frames for the bees to draw comb on, but these are shorter frames designed to fit in the medium sized box. We are thinking of this as an auxiliary storage area (self-reliance) to help our bees get through the winter. While many beekeepers wait to add this on until after they have harvested their honey, we want to let our bees store up their supply before we stake any claim for ourselves.


The honey super, with the
flow frames will be added
to the hive later in the summer.
Once we know our bees are well prepared with food stores we will then add the honey super. The honey super is normally just another box with frames that the queen does not have access to, but in our case it has the flow frames that we will be able to drain the honey from the frames without removing them from the hive.

You keep the queen out of the honey super using a queen excluder, a plastic grid that is large enough for all the bees except the queen to get through. This allows the bees to fill the frames in the honey super with honey while making sure the queen does not lay any eggs in the your honey.

Alan adding the queen excluder on top of the brood box.

The queen excluder can be seen
through feeding hole.
The feeder jar in place over the hole in the top board.
The roof of the hive has been removed in this photo.
One more analogy and then I'll stay away from the topic of bees for a while. Alan made a purchase this week that will serve multiple purposes. It is the Hive Genie. It is a hi-tech device (Purpose #1 a new toy) that monitors the health of the hive in a variety of ways (Purpose #2 aids in the goal of bee haver vs. bee keeper) that even comes with its own solar panel (Purpose #3 solar panel - enough said). Get the analogy? It's a bee monitor (as opposed to a baby monitor).

Thursday, April 27, 2017

We Have a Lot of Vegetarians to Feed

First let me say I have struggled with this blog a lot. Not because of writer's block, but just the opposite. I always have so much I want to talk about when it comes to my gardens that I have a hard time sticking to a subject. My goal today is to introduce you to this year's gardens, then in subsequent blogs I will discuss various aspects of the care and feeding of our gardens throughout the season. And hopefully, in return, their care and feeding of us.

The rabbits' salad bowls filled with foraged greens
from the property (weeds) and baby carrots that
were on sale at Aldi so they got a treat that week.
As with every other year, we had a couple of expansions planned for this year, not only in the physical size of two of the gardens but also in the variety of produce we are planting this year. When we added the raising of meat rabbits to our self-reliance endeavors,  one of the goals that goes along with this project is to develop a feeding program that does not require buying commercial rabbit feed. Our plan is to be able to grow and forage all of their food off of our land. This entails harvesting not only enough fresh food for them daily during the growing season, but also enough to dehydrate and store up for the winter months. This past winter we experimented with feeding a variety of store bought and home-grown produce that we dehydrated in addition to commercial pellets, and the rabbits preferred the produce. They often seem to prefer some of the dehydrated options over fresh ones. As we add in more and more produce, the adult rabbits often leave their pellets untouched between feedings. The young rabbits we are growing out to butcher still finish off all their greens and pellets, but we are fine with that as we want them to reach a decent weight soon.

A raised bed of crimson clover.
Honestly, I did not digress from my garden topic. I was just explaining the large influx of vegetarians we are now feeding. If I had not, you would probably be questioning some of the new items we're planting this year. For example, we have raised beds full of crimson clover, plantain and thai basil for the rabbits. Alan also ordered 10,000 dandelion seeds from Amazon.com, not for the rabbits but for the honey bees which will be moving in this May. We'll save that for another blog. (As I am proof-reading this, we got a call a couple days ago that the bees were already set to be picked up and they are now moved into Clive, the hive on our property.)

I decided the best way to introduce the gardens, without going into a lot of details that I plan to cover in subsequent blogs is to give you a verbal, virtual tour as if we are taking a walk around the property and I am pointing out the gardens to you. I have also included a visual aid, as I was planning out our extensions this year I re-acquainted myself with an old friend - my graphics design program - to create layouts of each garden and I am also including links to PDFs of the schematic I created for each garden.
View Kitchen Garden PDF

A typical 'path' to the gardens.
So put on some sunscreen and watch your step. I have been clearing some rocks in areas I consider pathways to the gardens and to the rabbitry,  but it is a loosing proposition. I dig up the rocks that are sticking up, the ones that trip us if we're not looking, but given a month or two and a few rains others soon take their place. There are also quite a few roots that have broken the surface along the drive and the path, on occasion I have dug up a rock only to realize the empty space has now exposed the side of a root to make an even greater tripping hazard. We have recently spread cedar mulch in the rabbitry to smooth out the 'floor' in front of the cages and that has helped immensely.

Sometimes we buy dirt by the truckload, other times
we pick up bags of top soil. Either way, it then gets
mixed with other ingredients before going into the
gardens. This spring, so far, we are up to 68 bags of
top soil - 2720 pounds carried, mixed, and dumped.
The same is true inside the garden areas, it is so rocky there is no dirt. In each area we have cleared the ground of overgrown vegetation and all the large rocks. We then dug up as many visible rocks as we could to make the ground even and covered the entire garden plot with landscape fabric. The actual gardens are then comprised of raised beds and various containers. One area we are not self-reliant in is dirt. we have to bring all of our dirt into our gardens. In the near future I plan to write about how we make our garden soil.

Here we are at the first garden, we call it the kitchen garden. We originally named it the south garden, because it is on the south side of the house, but a couple years ago we added in the garden that is a little farther south down the slope. We considered calling that one the south-south garden but thought it might be confusing, and I liked the idea of having a 'kitchen garden'. Technically, this garden is not outside the kitchen door like the term usually refers to, but the kitchen window over the sink does overlook this garden. By the way, we now no longer have a south garden because we started calling the other garden the 'bottom garden' because the original section was at the bottom of the slope going down towards the road.

East half of the Kitchen Garden
As we open the gate in the cattle panel fence, you probably notice all the pallets laying in this garden. These are all of our strawberry beds.  We currently have three varieties of strawberries. The lion's share are Ozark Beauties, but last year I bought two plants each of Berries Galore and Ft. Laramie. We love the Berries Galore, they are a tiny little berries with super flavor. They hardly ever make it into the house, because of their size they are more of a little treat than a real food source. The Ft. Laramie are a bit of a dud and will probably be replaced with another test subject. The Ozark Beauties have been a great producer and taste great. We have also been able to propagate them with no work on our behalf. I had planted about eight plants in a kiddie pool two years ago. Last fall I had noticed the pool was really crowded so I moved an extra long pallet that some of our solar panels had shipped on into the kitchen garden, prepped it for planting and transferred all the berry plants from the pool. I only placed plants in every other row of the pallet so that they would have plenty of room to send out stringers to start new plants. It ended up that there were now so many plants in the pool I had to also use another normal sized pallet in order to transplant all the berry plants. However, with the plants all spread out this year they do not look as healthy as they did overflowing the pool last year. I am sure they will soon expand and grow into their new home.

West half of the Kitchen Garden
Next to catch your eye are probably the dozen concrete blocks arrange in groups in this garden. They are all lying on their sides with the holes facing up and filled with dirt. This was one of last year's experiments as an herb garden. It was very successful with different herbs in each hole. So far this year I have not re-planted the herb garden but quite a few are coming back on their own - Italian oregano, orange mint, peppermint, spearmint, sage and thyme. I did use a few of the bricks to plant the last of my indoor starts, a couple peppers and marigolds, when I was trying to get everything in the ground one afternoon and ran out of dirt to fill more containers. I am calling it another experiment to see if the peppers will have enough room to grow in that limited space.

There are also a couple of tires in this garden. Some people frown at using tires for container gardening but I have never come across anything in my research to prove there is any harm in using them and they work great for vegetables like squash and pumpkins. Since you usually plant these types of seeds in 'hills' rather than rows, I consider each tire to be a hill. I place them along the fence line for trellising. I just planted a pumpkin in one of the tires, I don't even know what kind it is because it was given to me by a barista at a coffee shop we frequent. She grew it from seed but did not know if it was a pie pumpkin or not. But is does have a name, in fact other than the Seven Dwarfs (see my last blog) this is the only plant in the gardens that has a name. The pot the pumpkin came in was labeled 'Basil' so he is Basil the pumpkin.

The other tire has one of our ubiquitous luffa gourds. The first year of gardening I grew these on a whim. I had always thought luffas were sponges until I saw the seed packet for luffa gourds. That fall as I peeled the dried gourds, shook out the seeds and cut the fiberous  gourd into hand sized 'sponges' I was hooked and I grow them every year. Last year we discovered the rabbits absolutely love to eat the luffa leaves, blossoms, vines and immature (2-3 inch) gourds, so this year we have tripled the number of luffas and hope to have them vining along the fence lines of all the gardens. They also blossom all season long and attract lots of pollinators so the honey bees should appreciate them, too.

All that is left to see in this garden are the tomatoes. The eight extra-large planters on the southern fence line have Amish Paste tomatoes. When I started looking for tomato varieties, I wanted determinates as I planned to can all that we harvested. Determinate varieties set all their fruit within a short time span while indeterminate strains spread their production out over the entire growing season. Amish Paste are actually inderteminates, but that is no longer a factor to me as I mostly dehydrate my tomatoes now. It is actually a plus that I do not have to process them all at once and these are a very meaty tomato that remind me of an overgrown Roma. The extra-large planters will hold two 5-gallon buckets of dirt. Many people grow tomatoes in 5-gallon buckets so this year I have doubled up my tomatoes in a few of these containers as another experiment. Well okay, I had more tomatoes than containers so I created another experiment, five Amish Paste are planted individually and six are doubled up in three planters.

Right next to the deck we have our second variety of tomato, Mariglobes. Five of these are planted in large planters which hold about a 5-gallon bucket worth of dirt  and then another four are planted in half of a plastic 55-gallon drum that sits in the back corner of the garden. I will not call this an experiment, I just had way more tomatoes than expected thrive through my seed starting process this year. Without grow lights, I am always rotating my seedlings into my south facing window during the day for light and then move them over by the wood burner at night to keep them warm. I start more seeds than I plan to plant knowing I will loose some before it's time to move them outside.

Now on to the Bottom Garden, it's just a little ways down the hill but watch you step. There are a few big rocks along the path I could not dig up, I call these the icebergs - they may look like just a little pointed rock sticking up out of the path, but once I started trying to pry them up with a crow bar or the 6-foot pry bar. If they look to be larger than a bowling ball they are allowed to stay.
View Bottom Garden PDF

The newest extension to the Bottom Garden.
You can see the water tank for the shed roof
on the slope above the garden.
This garden has been expanded twice. The gate where we are entering used to be the upper edge, last year we expanded up the slope another ten feet or so and then this year we added the narrower 'ell' that goes further up the slope and has the kiddie pools on terraced steps. Look up the hill by the shed and you will see Alan added in another water catchment tote that gets rain from the shed roof. We can gravity feed the water down to this garden and Alan added in a 'T' and a second hose to go along with this year's expansion.

I forgot to show you our watering system in the kitchen garden. We use the water from our main tanks which are pressurized. We also treat that water so I always make sure not to water the kitchen garden for about 24 hours after Alan adds the chlorine powder to the tanks. If need be, I can always carry a bit of water up from the bottom garden in 5-gallon buckets if something up there needs watered right after the main tanks hve been treated because we never treat the tank connected to the bottom garden hoses.

This is the rhubarb I started from seed.
I hope you're not getting tired yet, I will give you a quick synopsis of what we have here and then we can pop over to the North Garden. Down along the south fence in the original section we have mainly perennials. There are raised beds of ground cherries, elderberries, blackberries, raspberries and rhubarb. I just transplanted the rhubarb this last winter as it was in a bed that was blocking the entry to the new extension, I am glad to see it is doing so well. I started that rhubarb from seed two years ago and this is the first year for harvesting. I have been getting several stalks from each plant for the last few weeks.

The cutting I took from the healthy black current plant
and transplanted to the pot on the right.
There are a few other perennials besides the ones I listed in the raised beds. The two brown planters have black currents which are Alan's favorites. I planted them last spring and we lost one, but it looks like a cutting I took off the healthy one has taken. If all goes, well I will start a couple more cutting this fall. We also have another variety of elderberry in that plastic barrel ring. We go elderberry picking along the roadside every year, but I am excited that the 'sticks' I planted last spring have propagated so much. These are all domestic varieties that I ordered and I am going to try to start some cutting in the clearing across the road down by our creek this fall.

Grapes getting ready to blossom
I almost forgot, turn around and you will see our grape vines. Sorry I don't know what kind they are. I bought them on clearance the first fall we were here and I planted them in the plastic totes. I really didn't think they would do well, but last year they had lots of little grapes until one morning I came down and they were all gone except one - it tasted great by the way. This year we will be taking some early defensive measures to protect the grapes from birds and critters. Look close and you will see all the tiny little blossoms that are in bunches where the grapes will be.

The raised bed in the foreground are two types of beans.
The cattle panel fence is the grape trellis and behind that
are elderberries. The pots on the right are the black currents. 
There used to be tires all along the grape trellis, which is a full section of cattle feedlot panel like we use for fencing in all of our gardens. This spring I moved all the tires to various nooks and crannies around the garden to make room for these four raised beds. We were playing musical chairs as the raised beds came out of the North Garden to make room for some of the fruit trees. Two of these beds have yellow beans and two have red anasazi beans. As another density experiment one bed of each variety has two beans planted in each hole. I also have a raised bed each of Hutterite Soup Beans, Clay Cow Peas and Rice Cow Peas. I allow all my beans and cow peas to dry on the vine and store and use them as dried beans. I particularly like to use the cow peas in batches of soups and chili that I can in the fall. Alan is not a fan of beans and the cow peas are smaller. So far he has liked all the home made meals I have canned that include them.

The vines in those six tires across the path from the beans are already taking over that part of the garden. Those are my favorite vegetable that I grow each year - Candy Roaster Squash.  These squash can grow to about two feet long and are banana shaped. They are a great tasting winter squash with a very smooth texture. I used to grow delicata squash as well, but they are so small the yield is not worth it. One of the differences between gardening for self-reliance and gardening as a hobby is that for self reliance you want to grow types and varieties of produce that will give high yields on a hopefully consistent basis. If I get three little delicata squash per plant (weighing 4-6 ounces each) vs.even just one candy roasters per plant (weighing 5-7 pounds each), the candy roasters are a much higher yield. Plus they are better tasting and the prep time for dehydrating is less because you would need to peel, clean and slice a couple dozen delicata to get the same amount of 'meat' as you would from one average candy roaster.

That raised bed at the bottom of the garden was just filled with dirt a couple days ago. I turned it into a second bed of ground cherries because our little granddaughter loves ground cherries. Last year I mailed her a package of them and also made her a ground cherry pie at Thanksgiving. So now that bed has been dubbed "Hanna's Ground Cherries".

This view is from up in the 'ell' extension we added to the Bottom Garden.
As everything grows, I will include more detailed photos in my updates.
Right now, many would be just dirt and I wanted to give an overview.
We have four varieties of tomatoes in this garden: St. Pierre, Roma, Italian Heritage and Rutgers. Some of these are on trial, especially the Rutgers which were iffy last year and only two made it to the planting stage this year. Last year I bought a few different heirloom tomato plants at a farmer's market. That way I could try out single plants to see if we liked them and then save the seeds to add them into our garden plans this year. That is also how I got the Italian Orange Bell Peppers that are in the pots between the bean beds.

These three pots over by the St. Pierre tomatoes have cayenne peppers. I plant cayennes every year, not because we use a lot of them but because I like how they look growing in the garden and also how they look dried whole and stored in glass jars. They make a nice gift. The favorite way I have used them is adding a few flakes to my pickled pineapple chunks that I can - yummy!

The tires over by the rhubarb have a new squash for this year called Trombocini. This one piqued my interest because it can be harvested as a summer squash and a winter squash. I have not found a summer squash that I like, and you can image how Alan feels about them (he claims to be chlorophyll intolerant, remember) but reviews say this one tastes better than zucchini. The reviews as a winter squash are not as glowing, but if it can't compete with my candy roasters - I am always looking for more rabbit food. And if the rabbits don't like it (they can be picky eaters), well some experiments are bound to fail.

Spinach starting to go to seed.
Just a couple more things to see here before we head to the other side of the property. Let's head up into the new extension. As I was clearing this area, I terraced the slope so that we could have kiddie pools sit here on level(ish) ground. I started working on this last fall and, even though it wasn't yet fenced in, I planted kale and spinach in two of the pools in December. I have been harvesting micro-greens since mid-February (it has been a mild winter) and look, the spinach has just started going to seed. I am excited to see if I can successfully save these seeds, as well. The majority of our gardens are now planted from seeds we save from the previous year - another difference between self-reliance and hobbiest gardening.

I skipped pointing out a few of the tires, some have luffas, of course, and a couple have tomatoes as an 'experiment' because I ran out of large pots and I have never tried planting tomatoes in tires. I have one tire in which a monster resides. I have transplanted luffa plants into this tire several times and each time I came out the next day and at least one of the plants was completely gone. The ground was not disturbed, it was not dug up, there was no sign of a stem or leaves - it was completely gone. No sign it had ever been planted. If one remained, it disappeared without a trace by the next morning. After this happened three times, I decided to plant two tomatoes in that tire instead. As I planted them I did find the remains of a luffa stem just below ground level so something was breaking or chewing them off very cleanly just below the dirt and then either removing or devouring them. Anyway, the next morning I came out and one tomato plant was gone. To date, about a week has gone by and the other tomato is still there. I guess the monster decided it doesn't like tomatoes. I have now extended my experiments to include the monster and I have planted some luffa seeds in the tire to see if the monster will allow them to sprout.

Okay, if you're not tired of the gardens yet we can head to the other side of the house to the North Garden, it won't take long, I promise. We can stop and say Hi! to the bunnies on the way. We can grab some of that spinach and kale because they are always looking for greens if we go into the rabbitry.
View North Garden PDF

East side of the North Garden
And here's the North Garden. Last year it was very neglected, the path became over grown and this side of the house always seems to have more mosquitoes. That and the fact that I had only planted about half the beds was enough of an excuse for me to not make the trip over to tend to it as much as I should have. This year we have dedicated several of the raised beds to rabbit food so I will be coming over almost daily to forage for the rabbits.

The first thing you will probably notice is our Seven Dwarfs, the dwarf fruit trees we planted this spring. Six of them have leafed out and seem to be doing well. One, the bartlett pear, is still dormant and we are starting to fear it may not be viable. He has been dubbed Sleepy. Other than the trees, most of this garden is raised beds and here is a rundown of what is currently in them:
West side of the North Garden
Plantain
Swiss Chard
Black Berries
Red Salad Bowl Lettuce
Thai Basil
Red Russian Kale
Lemon Balm
Crimson Clover
Teddy Bear Sunflowers
Cinnamon Basil
Green Oakleaf Lettuce
Black Beauty Zucchini

There are also luffas in this garden and a new winter squash I am trying called 'Sweet Meat'. While I rave about my Candy Roaster Squash, I always like to have a second variety to fall back on in case one should have a bad year, another self-reliance contingency.

Well, that is where the gardens stand for now. I still have a few empty raised beds and smaller pots that are still available for planting. My plans are to add some marigolds and zinnias. The marigolds are critter inhibitors when I place the pots around the edges of the gardens and both types of flowers are treats for the rabbits. Come on back in a few weeks and I will let you know how we filled the rest of the beds and show you how everything else is doing.

I have certainly enjoyed this garden tour. It is the first time I have spent so much time in the gardens in April without a single tic, chigger or mosquito bite!

Saturday, April 15, 2017

You Get What You Pay For... Not Always!

When we were getting ready to jump off-grid we were making a lot of purchases for our new lifestyle, and Alan loves to research to see what options are available whenever it comes to getting something that we need or may find useful to add to our resources. It is amazing how many varieties of a 'widget' he can find available and how much time he can spend comparing all of their features before selecting the one to best meet our needs. However, in the past couple of years I have made some purchases that have not turned out so well, and this is the tale of those unfortunate choices...

At the start of 2016 we decided we would establish a small orchard of dwarf fruit trees on part of our property. I found a nursery online selling a large variety of dwarf trees and they offered them in several heights so that you could get larger, more established trees if you were willing to pay a bit more more per tree. They also offered quite a selection of free items if you spent a certain amount per order. I am always looking for a deal so I put together an order, making sure my total hit that magic number, and then picked out all of my free trees and berry plants that would be included. And on April 30th, 2016 I placed my online order to Summerstone Nursery. (I am purposely not providing the URL because I do not want you going to the site and being tempted to place an order like I did.) I immediately received an order confirmation and then never heard from them again. Not that I didn't try.

I started with emails, about two weeks after I had placed my order, asking for a shipping date and tracking number. When there were no replies to my emails I started making phone calls but their voice mail was always full so you could not even leave a message. At that point, which of course was too late, I started researching the company and found out they had an 'F' rating with the better Better Business Bureau. Alan also did some digging and found out this company had changed its name because of past legal issues. At one point it had even been ordered by the courts to hire more office staff to answer the phone and the more I heard I just knew we were never going to hear from them.

I then contacted my bank to see if there was anything that they could do. The bank representative said they would contact the company and, if they were not fulfilling the order, the bank would refund my money and then take up the issue with the seller. I explained that I had not been able to leave a message with the company because their voicemail was always full. At that point the bank rep put me on 'hold' while she tried to contact them. When she came back on the line she said that she had got the same message and thus she was authorizing my refund immediately.

After a bit more due diligence, I found a well established and more reputable nursery offering dwarf fruit trees, Stark Brothers (www.starkbros.com), which has been around since 1816. I placed my order in August and received my order confirmation with an estimated delivery date of October 10th. The web site explains that the trees are delivered for fall and spring planting seasons.

Alan cut the top and bottom from plastic 55 gallon drums and
then cut them into three rings about one foot high each.
As the delivery date approached we started making plans for where and how we would plant our new trees. We doubted we would be able to dig large enough holes in our rocky land to accommodate the trees' roots, so we had to think outside of the box once again. Some people actually plant dwarf trees in large containers and then aggressively prune them to keep them confined to container size. With all of our success with raised beds, I came up with what I hope is a successful hybrid idea. We had some food grade plastic 55 gallon drums we had picked up for storage. I asked Alan to cut a couple of them into three sections each, forming sturdy plastic rings about 1 foot tall and 2 feet in diameter. These rings would act as partial raised beds for our trees. My plan was to place a ring on the ground where I wanted each tree, break up the ground as best I could inside each ring and remove as much of the rocks as possible to make a deeper hole for 'good dirt' within the ring and then plant the tree so that the roots were getting a start within the good dirt before they eventually worked their way further down to the native rock and clay.

Prepping the 'raised hole' included cutting the landscape fabric,
breaking up the rocks and clay under the ring and removing  as
much of the native 'dirt' (aka rocks) as possible under the ring.
As the estimated delivery date that had been provided on our order approached, I started going online to check my account at Stark Brothers to see if our order had shipped. The order status continued to show the status as 'In Process' with an 'Estimated Delivery Date' of October 10th. The week of the 10th I expected to see a change when I logged in, and I did - the estimated delivery date was rescheduled for October 17th. Then the following week it was rescheduled for the 24th, then the 31st.

This weekly rescheduling continued into November when I called to try to get a more precise idea of when the trees would be delivered as we would be out of town the last 10 days of November. The representative at Stark Brothers explained that shipping was controlled by the weather and when trees went dormant in the fall. I explained that we would not be able to take delivery the last 10 days of November and the rep was a bit hesitant to set a delivery date after that saying that December was too late  in the year. Instead, she offered that they reschedule the order for the spring planting with delivery scheduled for about the first of March. As the trees are not paid for until they are shipped and we were a bit pressed for time with our plans to go out of town, I agreed that this would be a good solution. After I hung up, it dawned on me that while they currently were not yet shipping as we talked (early November) the salesperson still felt that by the time we were back in town (the first week of December) it would be too late for them to ship. That is a very small fall shipping window for their business!

So, while my tree saga was on hold for a few months, until the 'estimated delivery date of March 3' as stated on my new order confirmation, we have yet another story to tell... (Don't worry, I will swing back around and finish out the tale of the trees.)

If you keep up with our blog, you know we started raising meat rabbits last summer. We had our first kits (baby rabbits) on February 2nd and will be butchering in a few weeks. Soon after the kindling (birth) I started looking for an instrument/tool I had heard about that is a humane way to 'dispatch' the rabbits for butchering. A quick Googling found the Rabbit Wringer and I placed my order (again I am not providing a link on purpose). I mentioned this product at our weekly self-reliance meeting and several people were familiar with the product. The receipt stated to allow 3 to 5 weeks  for delivery. As a small business, I assumed they  were producing the product as they were ordered and that was the reason for this lengthy time to receive an order, but we would still have it in time for processing our first rabbits.

After waiting the allotted five weeks, I attempted to contact the company to verify the Rabbit Wringer had been shipped. I emailed asking for a tracking number. After no reply to several emails I went to the website to get a phone number. Listed with the number was a note that this was a number to leave messages only and that your call would be returned... I started to get a sinking feeling. I left a message and began Googling this company. Déjà vu, another very poorly rated company from the Better Business Bureau for not delivering their product. In my defense, this business had in previous years had good reviews of their product in homesteading and self-reliance magazines and web sites. But apparently they continued to sell their product but stopped shipping it out.

While I decided to contact my bank once again, I was doubtful I would be successful in getting a refund this time for a couple reasons: 1. the web site took payment through PayPal so the payment had gone through a third party and 2. I had paid with my debit card rather than a credit card. However, my bank came through yet again with an immediate refund when they could not contact the company. There was one awkward moment during the conversation with the bank representative when she asked what it was that I had purchased from this company. I did not want to say I bought a 'rabbit wringer' nor did I want to say I bought something to kill rabbits. I sort of skirted the issue by saying we raised rabbits and this was a metal tool for processing them. When I later received a copy of her report she listed it as hardware.

The Hopper Popper
(http://theurbanrabbitproject.com/)
While I was salvaging this second bad purchase, Alan was searching for a new solution for dispatching our rabbits. There are various ways we could do it without a special tool, but we want it to be as humane and quick and easy as possible. Alan found another web site selling the 'Hopper Popper', and yes it is a knock off of the Rabbit Wringer. But, it has many favorable reviews, including ones that includes sentences along the lines of 'and unlike the Rabbit Wringer they actually ship their product'.

So, the Hopper Popper was ordered, and while it did not arrive quickly, it has arrived and looks very well made and there will be a blog in the next month or so letting you know how it works.

And now back to the tree saga...


Alan thought we needed to take the
big truck to pick up our seven trees.
(They are all in this box.)
As March 3rd approached I again started logging into the Stark Brothers web site to check the status of our order. At the end of February the Estimated Delivery Date changed to March 10th, then the next week it changed to March 17th, then March 24th... Sound familiar?

I was so used to the date being moved back each week that when I logged in near the end of March and saw that the Estimated Delivery Date had been updated to April 1 I almost missed that it also showed that the Amount Due was $0.00! The payment had been processed and the trees were being shipped! That was on Wednesday, March 29th, which was the same day I received the Hopper Popper. That night at our self-reliance meeting I was able to report two miracles - I had received our rabbit dispatcher in the mail and our fruit trees had shipped!

We picked our trees up at our postal box in town that Saturday and they were in great shape. They are all planted and I will include them in garden updates this year to let you know how they are doing.

One of our Seven Dwarfs
(I just realized we had Seven Dwarfs as I
was writing this caption so now I have to
name the trees...Sleepy, Dopey, Doc...)
While I am making submissions to the complaint box, I will include one more. If you are familiar with our gardens, you know they are all raised beds and containers and that I have put down landscape fabric as a 'carpet' over the entire area of each of the gardens. I had originally purchased 200 foot rolls of landscape fabric from Sam's Club but after 3-4 years of being down in each garden the fabric was wearing through in areas, especially where rocks were working their way up out of the ground and sticking through the fabric. I decided this was the year to re-lay another layer of landscape fabric.

We had let our Sam's Club membership expire as we hardly ever used it and last year I had bought three 200 foot rolls of landscape fabric at Tractor Supply when they were on sale. After digging up all the rocks that had worked their way to the surface of the gardens I pulled the rolls of Tractor Supply landscape fabric out of the shed to start laying it down. The first thing I noticed was that it was very thin - I could see through it. I had a lot of old cotton fabric, so I decided to first lay down a barrier of cotton fabric to help protect the landscape fabric from potential rocks and then spread the landscape fabric over the cotton fabric.

This is the Tractor Supply landscape fabric just a few
weeks after I had laid it down in the bottom garden.
I was so disappointed, while the Sam's Club landscape fabric had held up for several years, the stuff from Tractor Supply was tearing as I laid it down and in just a few weeks it was shredding in areas where the ground is uneven. Just yesterday I picked up some professional, heavy-duty (aka expensive) landscape fabric from Home Depot to put over the worst of the areas that I just covered with the Tractor Supply brand a few weeks ago. I hate to complain about something from Tractor Supply because we shop there a lot and this is the first product I have ever been really disappointed with.

Okay, that's the end of my rants. Just remember you get what you pay for... and this blog is free.

(Just a note: I feel bad about a blog full of complaints so I just want to let you know the next one will be much more upbeat. The gardens are almost all planted and my next blog, which will hopefully be within the next few weeks will be an introduction to this year's gardens. The rabbits are also due to be butchered soon, but I will be sure to not make that the next blog.)