Did it go as I expected? Pretty much, except for some huge bruises on my backside!
I will write an outline of how the day progressed. And I apologize in advance for any dark humor that works it way into my descriptions. We do respect our animals, take good care of them while raising them and dispatch them as humanely as possible. In fact our breeding pairs, Roger, Jessica, Honey and Charlie are a part of our family. But, we also realize that Alan and I also have a dark sense of humor that gets us through the more grizzly aspects of living self-reliantly.
Alan was in charge of photos, I haven't looked over them yet to see which ones can be included in the post. As this was our first experience, the educational photos may not be available until the next batch are processed -I don't remember Alan taking pictures during the skinning and butchering process. Those of you who are truly interested in the process can google for videos and and other sites with photos. This was something I did the night before to make sure I was familiar with what we needed to do, and not do.
Preparations started a couple days before as Alan started filtering a larger supply of potable water than we generally use. We had purchased a chest cooler large enough to hold the 'batch' and the plan was to have ice water in the chest to chill the carcasses. I also suggested we have a five gallon bucket with potable water for a pre-rinse before placing them in the cooler. We filter our potable water into 2 1/2 gallon bottles that we usually pour into our small holding tank for our kitchen system. As he worked on a supply of water for this project, Alan set the bottles aside as they were filled.
The day before the event, we turned on our freezer to make ice and also cool down some of the water. Alan filled some 2-liter bottles with water (no need to be potable) to freeze. He placed these and one of the bottles of potable water in the freezer. When the potable water was chilled he moved it to the fridge, we just wanted it cooled so it would not immediately melt the ice in the bottles when we added it to the cooler. We also mounted the 'Hopper Popper' and the 'Rabbit Cincher' on our deck posts, more about these helpful tools later.
Oh, one final 'prep' was to not feed the rabbits for 24 hours beforehand. Our breeder rabbits are housed in the same area as those that were to be 'dispatched' so I had a dilemma - I did not want to feed the breeders in front of the others, but I also did not want the breeders to go hungry just because we were withholding food from the ones to be dispatched. My solutions was to feed everyone the morning before (the 24 hour cut off), I fed the meat rabbits a very little amount while giving the breeders more than usual as I did not want to give them their usual nightly feeding in front of the ones we had stopped feeding.
The next morning we had a friend arrive who had offered to help. She had processed some rabbits the summer before and thus had some experience. As rabbits tend to scratch I put on work gloves (I was to learn this was a mistake) while Alan went to get the first one from the cage. Alan actually asked me which one I wanted first! We had 'named' all the meat rabbits Stewie but we always blamed Stewie #4 for any trouble that was caused in the rabbitry. When I was sexing the rabbits a few weeks earlier and learned we only had one male out our of the six, we designated him as Stewie #4. He was also the only one with dark gray ears so he was easily identifiable, so I said 'Bring Stewie #4'.
 |
| In the foreground is the Rabbit Cincher hanging from a hook on our deck. Directly below the cincher in the photo you can see the 'V' of the Hopper Popper which is mounted to the left of the Rabbit Cincher. |
 |
| Placing Stewie #4 in the Hopper Popper. (Gloves should not have been worn.) |
The first rabbit took me close to thirty minutes to 'muddle through' even though I had read directions and watched a video. The second one was down to about 20 minutes, the biggest learning curve was that I realized I needed to be more aggressive, not hesitant, which came with familiarity with the process and the anatomy. Then I watched our friend do a couple. This was also beneficial because we were able to see difference in techniques that we both used and recognize advantages of changing some of our methods. By the end I could go from 'cage to cooler' in just over 10 minutes while our friend holds the record at just under 8 minutes.
Upon googling how-to instructions prior to The Day, I discovered there was no one set of steps that everyone agreed upon. Based upon my experience last year, when I butchered chickens for the first time, I familiarized myself with the various ways people suggested and then planned to figure out what worked best for me. The further we get into this self-reliance experience the more comfortable I am with figuring out what works best for us rather than trying to replicate what others are doing. By researching several different approaches, I can usually ascertain the important points that need to be adhered to - in this case be sure not to puncture the bladder or intestines - and can then work through the rest in a manner that works for me.
This means the first couple of rabbits were guinea pigs to put into practice what I had been studying. Below is a basic description of the process from the point the freshly dispatched animal is hanging upside down from the rabbit cincher. WARNING: The following details may be considered a bit gruesome by some readers.
 |
| A rabbit in the cincher. Starting the skinning process. |
2. Start skinning at the hind feet. The two techniques I came across that I wanted to try were (a) to cut around each leg near the foot and then cut down the inner leg and pull the skin down the leg and (b) cut the skin up the inner leg from the groin towards the foot then you can easily pull the skin away from the leg and slide your knife under the skin up by the foot and cut it loose. I found (b) to be quicker and easier. With (a) it was difficult to cut through the skin near the foot because it was stretched so tight at that location. Starting at the groin you could pull the skin up and poke with the point of your knife to get it started.
3. Pull the skin the rest of the way off. With my first two rabbits I took extra time to cut around the tail and also used garden shears to cut off the front feet before pulling the skin all the way off as these were steps included in my reading. However, when it came time for my friend to skin her rabbits she did not do either of these. Once she had the skin loose from the hind legs she simply added a little more muscle and continued to pull and everything came off cleanly. Lesson learned - be aggressive.
4. Open the abdominal cavity. Do not be aggressive. This is where you want to take care not to nick the bladder or intestines with your knife. I am pleased to say we had no such accidents with any of the six rabbits. I was surprised that even though we withheld food and water for 24 hours their bladders and lower intestines were not empty. Back to the technique - carefully make a small horizontal cut in the meat between the hind legs, you can use the hand that not holding the knife to pull the meat towards you a bit and thus put some space between it and the innards. Now you can place your finger in the slit, pointing down, to open up the space between the meat and the innards. Carefully insert your knife next to your finger with the sharp edge towards the meat and carefully cut the meat open. You will be able to cut down for several inches until the start of the rib cage.When you pull your hands away some of the insides may start to fall out, but don't worry everything is fairly 'tough' and will not break open.
5. Disconnecting the innards. Again their are various techniques, my choice is to turn the carcass so the back is facing me and carefully cut the tail bone below the tail. I find kitchen shears or small pruning shears work well when needing to cut through any bones. Then I turn the carcass back around and carefully cut down along each side of the spine from the tail bone, basically along side where the intestine leaves the body. I just looked at this area closely on the first rabbit and figured out where to cut so that I could keep the tail and anus connected to the intestine and remove it all innards. Once you disconnect the small section up by the tail, everything will easily slide out.
 |
| Rinsing the carcass before placing it in the cooler. |
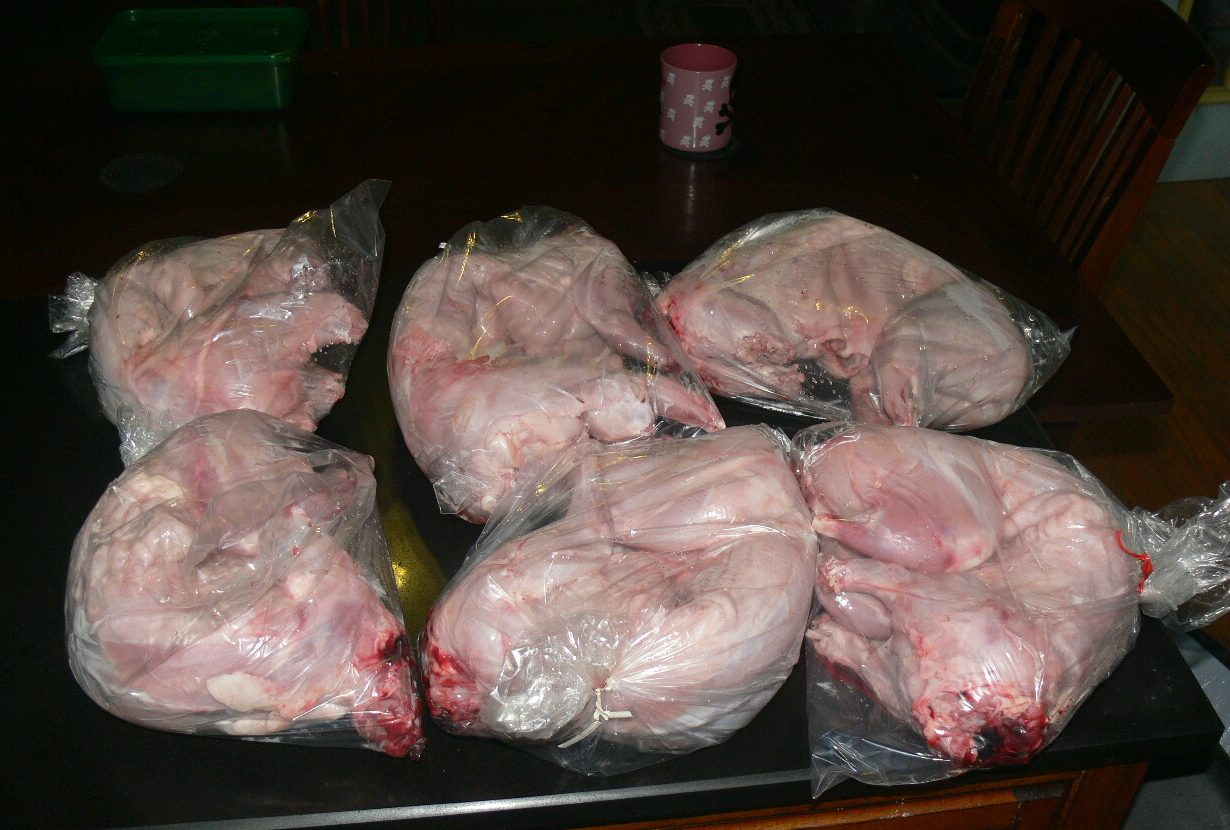 |
| Six rabbits, bagged for a 24 hour cool down in the fridge. The average weight of these six bags was 3 pound 9 ounces. |
 |
| The bone broth continues to simmer after removing the meat from the bones. |
 |
| Removing the meat from the bones. The meat will be canned in pint sized jars and used in soups, stews, etc. |
 |
| A sample of our first batch of canned rabbit meat and bunny bone broth. Guess which one we will be eating first! |
Hi Arlene, I wanted to return the blog visit and thank you for taking the time to comment on mine. It was my pleasure to review yours and Alan's book - it is absolutely the best book on solar electric that I have read! I am in the planning stages of trying some small solar projects thanks to you all. We will probably never get off grid, but we can definitely become less dependent on it.
ReplyDeleteCongratulations on your first meat harvest! We don't keep rabbits but we do our own chickens, ducks, goats, and pigs (when we had them). It's never a favorite thing to do, but we love having our own home-raised meat (bone broth too!)